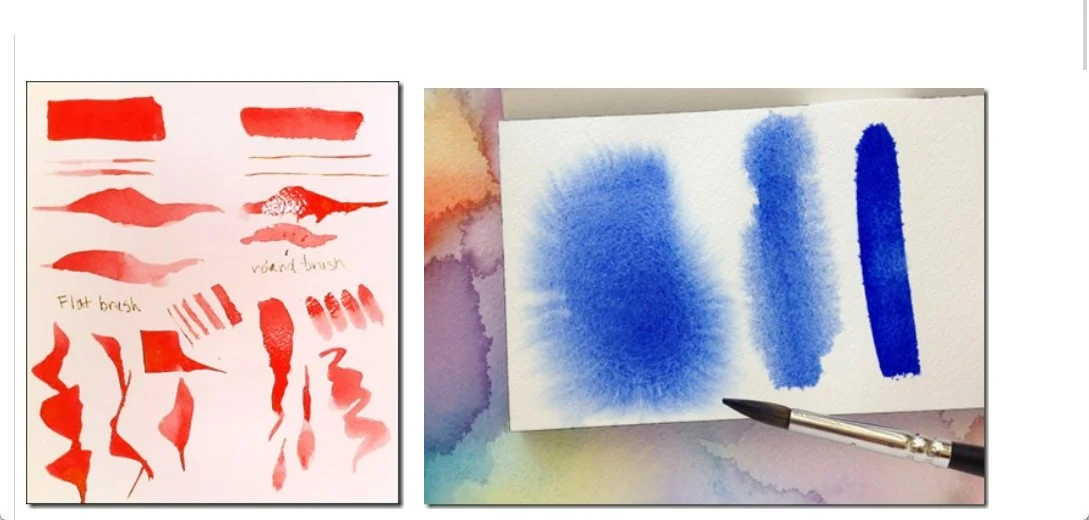
The Red brushstrokes above are on DRY paper, with milk or tea consistency paint
...made with various brushes.
DRY paper means they all have HARD crisp edges.
The Blue brushstrokes below were made on WET paper, in MILK consistency (liquid but lots of color): left to right:
LEFT: on VERY WET paper (lots of bleeding very soft edge)
MIDDLE: on DAMP paper (some bleeding, a few edges are hard)
RIGHT: on ALMOST DRY paper (right: fuzzy edge, but no bleeding)
WET or damp paper always means SOFT, DIFFUSED, “LOST” OR FUZZY EDGES.
VIDEO on Paint Consistencies, from TEA to BUTTER. She presents them in reverse order, from lightest to darkest, but this is useful to watch anyway.
https://www.youtube.com/shorts/I3Mht_EIsP8
Below are FOUR SHORT VIDEOS and a TUTORIAL, but watch them ONLY if you feel like it. Just watch, don’t try to figure out ‘how they do it’...that’s what you’ll learn in class. But these will introduce you to many techniques, and help free you from the tight, detailed, paint-by-number idea that so many beginners bring to watercolor.
1. This is the very first wc video I ever found...on videotape, those things Blockbuster used to rent, back in the Jurassic era. <g> Still a great intro to watercolor!
https://www.youtube.com/watch?v=xnaC1Vfk_RY&list=PL1v8JJ0S_UmDhelEJQuKFMMSzVoRaj_XQ&index=2&t=929s
2. Here are two simple forests, one monochrome and one in full color, done in LAYERS, drying completely between each layer:
https://www.youtube.com/watch?v=QnVI-IdW4WQ&list=PL1v8JJ0S_UmDhelEJQuKFMMSzVoRaj_XQ&index=22
3. Some simple but beautiful flowers. The artist shows how to make leaf and petal shapes, and to ‘drop in’ different colors into wet petals...very useful and beautiful techniques that we’ll learn.
https://www.youtube.com/watch?
v=KwxJDtf7mpc&list=PL1v8JJ0S_UmC0GobrvSUkD6SsDUms9a9N&index=14&t=455s
4. Here’s a more dramatic, speeded-up forest. As you may know, you can adjust the speed of the video by clicking the little round GEAR icon across from the volume, and choosing faster or slower.
https://www.youtube.com/watch?v=AuNJeriqq7I&list=PL1v8JJ0S_UmDhelEJQuKFMMSzVoRaj_XQ&index=22&t=13s
OPTIONAL – Extra-credit WATERCOLOR HOMEWORK
Can’t get enough? Here’s more. But only if you feel like it.
1.Brushstrokes and Wet-Paint Experiments
If you feel like more experimenting with your brushstroke... Here's some things to try with both paint-filled and water-loaded brushstrokes, with each of your brushes.
No matter what consistency paint you use, BE SURE your brush is not dripping wet. You can reduce the water in the brush by touching the TIP of your round brush, or the EDGE of your flat brush, to your mop pad , for just one or two seconds, before you put paint on paper.
This will remove the excess water from your brush, so you don’t end up with little lagoons of water that take forever to dry. (If you forget, just blot the stroke lightly with Your Best Friend, The Kleenex)
1. Paint parallel stripes of juicy thick paint (honey or cream consistency) with your flat brush: make them about 2” long; paint them about one-half inch from one another.
Then immediately clean your brush, swipe it twice, and then paint a clear-water stripe down the middle between them, so that the sides of your flat brush touch the inner sides of the painted stripes. Note, in every case, how the paint bleeds into the water, and vice versa.
2. Now do the reverse: Paint parallel stripes of water half an inch apart; use your flat brush, making water striped about 2” long. Then paint a thick, juicy (milk or cream-consistency) stripe of paint between them, so that the sides of your flat brush touch the inner sides of the water stripes. Again, note how the paint bleeds into the water. You can of course try this with various consistencies of paint.
3. DO the same with 2 colored stripes, and another color stripe down the middle. Again, the paint has to be wet and juicy for this to work, so choose your colors first, and make sure you have enough water in your well and your puddle.
BLOTTING PRACTICE:
1. Lay down a nice juicy milk or cream consistency 3" brushstroke and blot it up immediately with a flat folded kleenex (NOT a paper towel, please, and no paper napkins or toilet paper either), so you have virtually nothing left.
2. Make another juicy 4” or 5” brushstroke, but lightly blot with crumpled kleenex several times, so you have a textured line of color.
3. Paint a 4” square, milk consistency, and then paint it again...or touch in more paint. Lightly crumple-blot a texture from it. Did you blot up too much? If so, don’t press down so hard, and just blot for one second or less. You can add more paint to the square and try it again.
This is an easy way to paint clouds...or un-paint white clouds, actually.
Try other colors as well...you'll see some "lift" better (like the earth colors and yellows), and some are more staining (Prussian blue, Sap green, Quin Rose)
Practice soaking and scrubbing as well. Make small squares of paint, and let them dry thoroughly (20 minutes to be sure, or use a hair dryer). With flat brush dipped in water, swiped twice, and touched to mop pad for a couple seconds, see how much paint you can remove by scrubbing gently with the brush, blotting lightly with kleenex after every 5 or 6 strokes.
It’s always a good idea to do this experiment every time you buy a new color, so you can see how it behaves.
=================================
Don't worry -- relax and just experiment with your favorite colors, IF you have the time. The more you experiment and practice, the more you'll understand how the water and paint work together to create different effects.
And of course remember to share these next time,
so we can all enjoy each others experiments.
